Friday, March 30, 2012

Le Lust List as of March 2012


[Burberry's Classic Wool Check Scarf in Pink]


[Yves Saint Laurent's Arty Ring]

[Dior's Addict Extreme Lipstick]

[Yves Saint Laurent's Lip Stain]

[Tom Ford's Private Blend Lipstick]

Cheers,
Charlotte

Yeah, it's been awhile..


It's funny how easy it was to pen-down (or finger tap, in this case) my thoughts on beauty products. Then, life gets in the way; studies kicked in, assignments piled up and writing and reviewing about beauty items seem to be such a hassle :(. My apology.

Another reason why I haven't been posting much is because I left my camera charger back in Malaysia. Such a smart ass, I know. But since my parents are coming over next week (Yay!), I'll ask them to bring the charger along. So, for the time being, pardon me for the not-so-clear-taken-using-iphone-photos.

I'm currently back in Melbourne, doing the second semester of my master. Life's been quite tough. Stressful, I'd say. I often hear people say that studying in Australia is easy, shake leg and your cert will drop from the sky. Seriously, where did they get that idea from?

The weather now is still tolerable. I like it when it is sunny and windy, hate it when it is rainy and cold. Cold weather makes me feel lazy and hungry all the time. And damn, winter is just around the corner. It's not here yet, but I can't wait for it to be over!

After this long hiatus, I've decided to spice my blog up a teeny weeny bit. As you all can see, most (98.156%) of my blog posts previously talks about beauty products. In fact, I've forgotten that I'm allowed to write about random stuff too. So, be prepare to read about random silly, funny, non-beauty-related stuff!

Ending my update-cum-humble apology note with my nail of the day:

OPI's Too Hot Pink to Hold 'Em

The beautiful bright pink instantaneously brightens up my day!

Love,
Charlotte

Wednesday, January 18, 2012

Dior: Exquis

After knowing that I could now purchase my favourite brands of nail polishes at a more reasonable price from SecretAllure and Nail Fiesta, I thought I didn't have to spend that much money on my nails anymore.

But I was wrong. Thanks to Pam, the polish police. And definitely not in a bad way :)

I know I've fallen completely in love with these gorgeous babies from Dior's Holiday 2011 Collection the moment I saw Pam's swatches. Especially, Or Divin, the one in gold.

With Chinese New Year just around the corner and all the hard core shopping trips, my purse has definitely gotten thinner. I told myself that I should only get one, just one.

I went to Dior's counter at Parkson just yesterday, getting real excited only to know that they don't have any Or Divin's left!! :( And they were sold out, EVERYWHERE ELSE! How cannnnn????

The SA told me that the only one left from the collection at their counter now is Exquis. Since it's my favourite, after Or Divin of course, I bought it without thinking twice. Another reason is to compensate my disappointment! There you go, I justified my purchase!

Since this is my first bottle of Dior nail polish, you have to forgive me for admiring its packaging :P

Ladies, this is Dior's Exquis..

The golden shimmer is really subtle. It adds uniqueness to the taupey base. Something like a it's-there-but-it's-not-there, peekaboo thing.

At first, I was quite worried about the formula. From the bottle, Exquis looks like a dirty gold metal, and these kinda polish are streaky and hard to apply most of the time.

But, my worries melt off when I first apply it on my nails. It was smooth, zero streaky-ness. Two coats and you're good to go.

This is my ultimate splurge for a nail polish. It costs me RM70 a pop! But, I love it and I have no regrets!

The only bad thing is that, when there's a first, there's always a second. Dior! Imma gonna get you friendsss!

Exquis, you're simply exquisite!

Love,
Charlotte

Monday, January 16, 2012

A Visit to Sephora, Starhill..

The Naked 2 palette has been the talk of the beauty town ever since there were rumours of its existence. The hype went up to a whole new level when UD launched the palette in the states two months ago. I'm sure all UD fans from Malaysia, like moi, were anticipating for this palette to make its way here.

January 7th, Sephora Singapore had a pre-launch event for this palette, and that kept me wondering, does this mean......? Answer: Yes.

I was super excited when I saw Sephora Malaysia posted this picture on their facebook wall. Many UD fans have been bombarding Sephora Malaysia's facebook wall with questions regarding the event. It was obvious that many people are heading down to Sephora solely for this palette and we were informed that there were limited stocks for sale. I know it was fat hope but I decided to give it a try anyway!

I arrived Sephora at 2pm and guess what? I was the first in line! Pretty unexpected because a little bird told me that people started queuing at 12-1pm during the pre-launch event in ION, Singapore. The thought of knowing that I'll get this FOR SURE excites me but I wasn't excited for long. Beep beep beep! Rant alert!

Generally, I don't like other people taking pictures of me. Reason being I don't know how I'll look on their camera and if I look like shit I don't want the picture to get published. But when one of the staff kindly asked a picture of me for being the first in line, I forcefully said OK since this was a public event and they might need to include it in their report or something. But still, I don't like it.

I personally think that one picture is enough! It really made me super uncomfortable when the event managers and sales assistants kept taking pictures of me -,-. Seriously, it was damn embarrassing. I don't think that being the first is that big of a deal and I don't like strangers taking pictures of me! The moment I know that my picture-not-ready look is gonna get posted up on their wall, I hope that I was the second in line instead of the first. Why didn't I walk a tad bit slower?! Ishhhh..

Anyway, after having to wait for an hour, Eric Jimenez walked in, gave a speech blablabla and announced that we could finally made our purchase. I walked up to him, he passed me a NAKED 2 palette, when I was just about to walk away, the people asked for pictures AGAIN!

After that, Eric Jimenez gave a lady a make over, demonstrating different looks using the palette and at the same time promoting other products from UD.

Yeah, that was pretty much how my trip went. I happily brought home my Naked 2 palette!

Along with other stuff too :)

And when I'm home, I saw my picture on their facebook page. As expected.

Messy hair, not even looking at the camera. Simply awkward. Just Bleh.

So, did you girls manage to get your Naked 2 palette? How did your weekend went?

Love,
Charlotte

Friday, January 13, 2012

Sigma: Dry n' Shape & Taking Care of Your Brushes!

A set of make up brushes that meets one's expectation is hard to find and most of the time, they are not cheap. I personally agree that a good set of make up brushes is always a good investment. But, if you don't take good care of them (the brushes I mean), they won't last, and to replace them, you'll definitely end up spending more $$!

Here's what I do to try and keep my brushes functional as long as possible:
Make sure that they are clean!

Please, don't be such a lazy bum! Especially when your pretty face is at stake! Something for you bum-bums to think about: How often do you clean your brushes? Do they look exactly the same as you first bought it?

Dirty brushes harbor germs, mold, fungus and other yucky stuff. I'm sure no one will re-use a moldy brush. That's if they realised that it is moldy. And if they don't, they'll just continue using them. Ladies! Imagine coating your moldy concealer brush with more concealers, then putting it on your bare skin! The thought of it is just so urghhh!

Most of the time, these unpleasant things are not visible through the human eye. So while your brushes seem to be clean when you didn't wash them, they are actually not, and that explains the breakouts or infections.

So, my rule of thumb: spot clean them after every usage and deep clean them as frequent as you can (at least once every week). I follow this religiously.

Always leave your brushes standing upwards when they are dry and downwards when they are wet.

When brushes are wet, some people lay them flat to dry, but I think it is best to keep them slanting or standing downwards. This is to prevent the excess water from flowing from the bristles into the ferrule. This is able to prolong the life of your brushes as water can end up ruining the glue in the ferrule that holds the bristles together.

Brushes that went out-of-shape might not deliver the expected finish upon application. Hence if you were to keep them standing downwards when they are dry, the bristles might spread out and that'll definitely ruin the shape of your brush.

Easy as A-B-C: Wet-down, Dry-up. Kappish?

Re-shape your brushes after cleansing.

Know how 'WOWZA' our hair always look when we go to bed with our hair wet? Brushes are just like our hair, they dry in the shape they are left wet. As such, you will want to make sure that your brushes are shaped properly when they are wet, so you'll get to use them in the exact shape you want the next time when they are dry. Okay, that's a mouthful, but I hope you get the idea.

Do not blow dry your brushes!
Never ever do this even if you're in a rush. Drying your brushes using high heat can cause permanent damage to the bristles. They should be dried naturally. Direct sunlight is not an option too. If you really need to clean your brushes but you don't have the time, opt for an alcohol based brush cleanser and spot clean them. Alcohol has a lower boiling point compared to water, hence it evaporates faster and thus have a faster drying time.
Apart from the above, I have a secret weapon that makes my brushes love me and thank me big time! It is none other than...

Jang Jang! My Dry n' Shape!

This is Sigma Beauty's description of their Dry n' Shape:
The Dry n' Shape provides the necessary pressure to bristles to quickly and efficiently remove water from every fibre. The fabric used to shape the bristles was specially engineered to accelerate water evaporation, resulting in a faster drying time for your brushes.
Besides that, they also guarantee that it is able to dry and shape your most dense brushes within 4 to 6 hours!

How to use it:
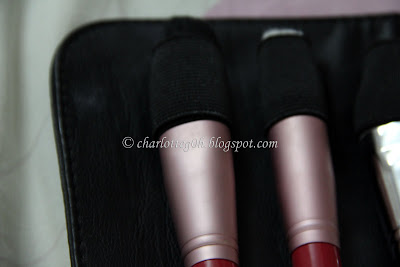
After having your brush cleaned, gently press the bristles to remove any excess water. Then, slide the handle of your damp brush down the band provided and into the bottom pocket holder. The brush should be placed like the picture shown above. Note that the bristles should not be visible between the band and the ferrule. This is to prevent excess water from flowing back into the ferrule.

The key here is to find the right size of band to fit your brush. Not too tight, as this might ruin the shape of your brush; Not too loose either, because you want the appropriate amount of pressure to be exerted so that your brush will dry faster.

There are altogether 12 bands in the Dry n' Shape. After placing all the brushes, you can lay the brushes flat down like this to dry.

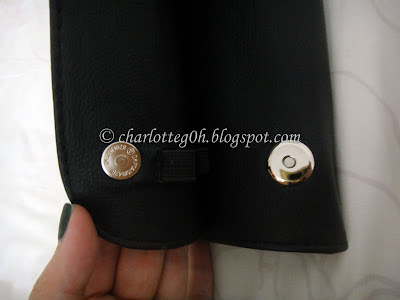
But, I prefer rolling my Dry n' Shape into a cylinder. This way it can stand on its own like this and my brushes are hanging downwards.

Do not place this under direct sunlight. Wait for about 4 to 6 hours, and your brushes should be completely dry and the bristles will be reshaped to their original form.

Remove the brushes using both hands: one to hold onto the band, another one to slide the brushes downwards. Do not push the brush upwards to get it out, you might ruin the shape of the bristles.

My Verdict:
  • My brushes dry within 6 hours. The densest brush, which is my Sigma F84, dries within 5 hours. Previously whenever I deep clean my brushes, it takes at least 10 hours or more to be completely dry. I'm happy that I have Dry n' Shape now as I don't have any extra/back up brushes if they don't dry in time.
Two of my brushes right out from the Dry n' Shape.
Laura Mercier's Blending Brush (top) & Sigma's F50
  • As you can see, the shape of the bristles are perfect! It's like I'm having brand new brushes!
  • I often use Dry n' Shape to store my brushes whenever I'm travelling. It has a pair of magnetic buttons to keep it folded securely. I can rest assured that my brushes are in placed instead of rolling around in my travel bag or getting squished and squashed by other objects in the bag.

Where to get it?


What's the damage to my purse?
$29. Remember to google for their 10% discount codes, they have a different discount code every month. This month's code is 0112XJML.

In conclusion, Dry n' Shape worked as promised. Some people might think that it's not worth the money. But, I think otherwise. This is definitely a hit! What say you?

Good day, y'all!

Love,
Charlotte

Thursday, January 12, 2012

Butter LONDON: British Racing Green

This is my first ever green nail polish. Figured that it'll be a good addition. Doesn't hurt to have varieties right? :)

British Racing Green

Deep dark green. Like a forest green. Or an emerald green.

With a hint of shimmer. Beautiful.

I did two coats. Application was effortless. No complaints.

Definitely a hit. Did not regret! Love it!

xo's,
Charlotte

Sigma: Angled Top Synthetic Kabuki F84 Brush

F84 Angled Top Synthetic Kabuki Brush of Sigma Beauty!

I now crown thee to be the

BEST FOUNDATION BRUSH

EVERRRR!!
Like many other make up newbies, I started off applying liquid foundation using my finger tips. It was okay but the residue of the foundation was such a pain in the you-know-what to get rid off! Most of the times, it got inside my finger nails and it was just horrible.

I tried using make up sponges too. Just normal drugstore ones. The application was streaky and what made it worse is that most of the products were being absorbed and there were little left for me to apply. So, as it might seems to be a cheaper option, it actually isn't. And I believe the same goes for make up wedges (correct me if I'm wrong).

Hence, I started my journey to hunt for the best foundation brush. My goal: a reasonable balance between price and quality.

While many sworn by MAC 187, Sigma's F80 Flat Top Synthetic Kabuki Brush receives many compliments and recommendations too. Some prefer MAC's over Sigma's, some the other way round. But what surprises me most is that those who claim to be loyal fans of MAC 187 also made their switch to Sigma's F80.

FYI, the price of MAC 187 is $42, and for Sigma's F80, $16. Wowza! Almost three times the difference! Being the stingy me, my decision was a no brainer. I decided to go for Sigma's.

And no, there was not a typo, and I did not crown the wrong brush. Simple reason why I chose F84 over F80: because it was angled. An angled brush is easier to work with especially at the corner of your eyes. And while you're applying foundation, your hand does not go 90 degrees against your face, your hand is actually slightly slanted, if that make sense.

So Sigma's F84 it is! Been using it for the past three months, I just can't apply my make up without it. Okay, that's a tad bit too exaggerating. Well, I just wanna stress that it is a very good brush!

I can give u 101 reasons as to why I love this brush so much, but first, lets see what Sigma Beauty has to say:
The F84 Angled Top Kabuki Brush is the perfect brush for precise, yet blended application of products on the cheeks. It seamlessly applies cream, powder and liquid products. Made of Synthetic Sigmax HD filament.
Now, my two cents:
  • I like that the handle of the brush is black in colour with a matte surface. It looks classy and expensive. Besides, it is also very sturdy. It's not too small nor too bulky. Thus, better grip and better control during application.
  • The bristles are so soft. I remember when I first got my hands on this brush, I couldn't stop myself from swiping the brush back and forth my palm. Yay! No more scratchy-pocky feeling while applying foundation.
  • The bristles are also very dense. Hence, it produces a good coverage in a blink of an eye! Haha, not that fast, but if you ask me, I'd say one minute, top!
  • Like I've mentioned earlier, I love that it has an angled top.
  • Most brushes tend to have their bristles falling off during the cleaning process. But so far, I haven't encounter any fallen bristles with F84. I spot clean my brushes every time I use it and deep clean them every one or two weeks.
  • For some reason, applying liquid foundation with this gives a flawless, air brushed finish. Not sure if it's the brush that does the magic, or the wonders of my MUFE's Mat Velvet Plus. But for me, if you're going for a smooth flawless look, you'll definitely need both of them!
  • Given its dense bristles, it is a brush that is exceptionally hard to clean. This is probably the only bad thing I can say about this brush. But if you're not a germ freak like I am, you'll prolly be fine. I've used Shu Uemura's and MAC's brush cleansers to clean this, the bristles look clean on the outside, but if you were to look into the roots, there are still residues of make up products. Yuck. And I can't stand it, seriously. (Stay tuned to know what I use to make my F84 squeky clean!)
Where to get it?

What's the price?
$16. Remember to google for their 10% discount codes, they have a different discount code every month. This month's code is 0112XJML.

In conclusion, this is a great must-have brush. It's my favourite brush! It's everything that I'm looking for in a face brush. And it does not cost a bomb. What more can you ask for?

Love,
Charlotte

P/S: I've only tried liquid foundation on this brush as I do not own any powder or cream foundation. So whenever I mention foundation in this post, I'm referring to liquid foundation.