A set of make up brushes that meets one's expectation is hard to find and most of the time, they are not cheap. I personally agree that a good set of make up brushes is always a good investment. But, if you don't take good care of them (the brushes I mean), they won't last, and to replace them, you'll definitely end up spending more $$!
Here's what I do to try and keep my brushes functional as long as possible:
Make sure that they are clean!Please, don't be such a lazy bum! Especially when your pretty face is at stake! Something for you bum-bums to think about: How often do you clean your brushes? Do they look exactly the same as you first bought it?Dirty brushes harbor germs, mold, fungus and other yucky stuff. I'm sure no one will re-use a moldy brush. That's if they realised that it is moldy. And if they don't, they'll just continue using them. Ladies! Imagine coating your moldy concealer brush with more concealers, then putting it on your bare skin! The thought of it is just so urghhh!Most of the time, these unpleasant things are not visible through the human eye. So while your brushes seem to be clean when you didn't wash them, they are actually not, and that explains the breakouts or infections.So, my rule of thumb: spot clean them after every usage and deep clean them as frequent as you can (at least once every week). I follow this religiously.Always leave your brushes standing upwards when they are dry and downwards when they are wet.When brushes are wet, some people lay them flat to dry, but I think it is best to keep them slanting or standing downwards. This is to prevent the excess water from flowing from the bristles into the ferrule. This is able to prolong the life of your brushes as water can end up ruining the glue in the ferrule that holds the bristles together.Brushes that went out-of-shape might not deliver the expected finish upon application. Hence if you were to keep them standing downwards when they are dry, the bristles might spread out and that'll definitely ruin the shape of your brush.Easy as A-B-C: Wet-down, Dry-up. Kappish?Re-shape your brushes after cleansing.Know how 'WOWZA' our hair always look when we go to bed with our hair wet? Brushes are just like our hair, they dry in the shape they are left wet. As such, you will want to make sure that your brushes are shaped properly when they are wet, so you'll get to use them in the exact shape you want the next time when they are dry. Okay, that's a mouthful, but I hope you get the idea.Do not blow dry your brushes!Never ever do this even if you're in a rush. Drying your brushes using high heat can cause permanent damage to the bristles. They should be dried naturally. Direct sunlight is not an option too. If you really need to clean your brushes but you don't have the time, opt for an alcohol based brush cleanser and spot clean them. Alcohol has a lower boiling point compared to water, hence it evaporates faster and thus have a faster drying time.
Apart from the above, I have a secret weapon that makes my brushes love me and thank me big time! It is none other than...
Jang Jang! My Dry n' Shape!


This is Sigma Beauty's description of their Dry n' Shape:
The Dry n' Shape provides the necessary pressure to bristles to quickly and efficiently remove water from every fibre. The fabric used to shape the bristles was specially engineered to accelerate water evaporation, resulting in a faster drying time for your brushes.
Besides that, they also guarantee that it is able to dry and shape your most dense brushes within 4 to 6 hours!
How to use it:
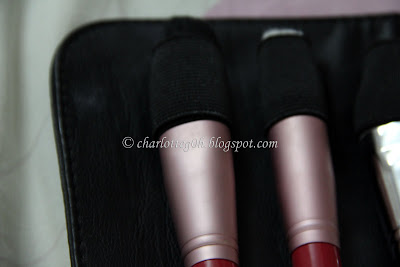 After having your brush cleaned, gently press the bristles to remove any excess water. Then, slide the handle of your damp brush down the band provided and into the bottom pocket holder. The brush should be placed like the picture shown above. Note that the bristles should not be visible between the band and the ferrule. This is to prevent excess water from flowing back into the ferrule.
The key here is to find the right size of band to fit your brush. Not too tight, as this might ruin the shape of your brush; Not too loose either, because you want the appropriate amount of pressure to be exerted so that your brush will dry faster.
 There are altogether 12 bands in the Dry n' Shape. After placing all the brushes, you can lay the brushes flat down like this to dry.
 But, I prefer rolling my Dry n' Shape into a cylinder. This way it can stand on its own like this and my brushes are hanging downwards.
 Do not place this under direct sunlight. Wait for about 4 to 6 hours, and your brushes should be completely dry and the bristles will be reshaped to their original form.
 Remove the brushes using both hands: one to hold onto the band, another one to slide the brushes downwards. Do not push the brush upwards to get it out, you might ruin the shape of the bristles.
My Verdict:
- My brushes dry within 6 hours. The densest brush, which is my Sigma F84, dries within 5 hours. Previously whenever I deep clean my brushes, it takes at least 10 hours or more to be completely dry. I'm happy that I have Dry n' Shape now as I don't have any extra/back up brushes if they don't dry in time.


Two of my brushes right out from the Dry n' Shape.
Laura Mercier's Blending Brush (top) & Sigma's F50
- As you can see, the shape of the bristles are perfect! It's like I'm having brand new brushes!

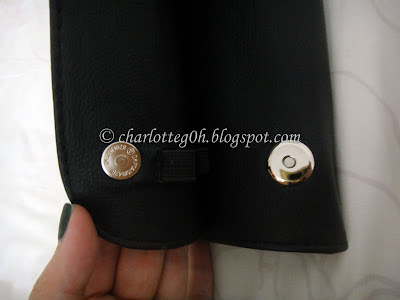
- I often use Dry n' Shape to store my brushes whenever I'm travelling. It has a pair of magnetic buttons to keep it folded securely. I can rest assured that my brushes are in placed instead of rolling around in my travel bag or getting squished and squashed by other objects in the bag.
What's the damage to my purse?
$29. Remember to google for their 10% discount codes, they have a different discount code every month. This month's code is 0112XJML.
In conclusion, Dry n' Shape worked as promised. Some people might think that it's not worth the money. But, I think otherwise. This is definitely a hit! What say you?
Good day, y'all!
Love,
Charlotte